DNS Server Installation & Configuration – Step-by-Step in Redhat Linux/Centos 6.x
DNS (Domain Name System), also known as a nameserver, is a network system that associates host names with their respective IP addresses. For users, this has the advantage that they can refer to machines on the network by names that are usually easier to remember than the numerical network addresses. For system administrators, using the nameserver allows them to change the IP address for a host without ever affecting the name-based queries, or to decide which machines handle these queries.
DNS is usually implemented using one or more centralized servers that are authoritative for certain domains. When a client host requests information from a nameserver, it usually connects to port 53. The nameserver then attempts to resolve the name requested. If it does not have an authoritative answer, or does not already have the answer cached from an earlier query, it queries other nameservers, called root nameservers, to determine which nameservers are authoritative for the name in question, and then queries them to get the requested name.
Lets take up the scenario to setup the DNS Server..
Master DNS Server – 1
Secondary DNS Server – 1 ( Optional )
Client Server – 1 ( With 4 IP’s )
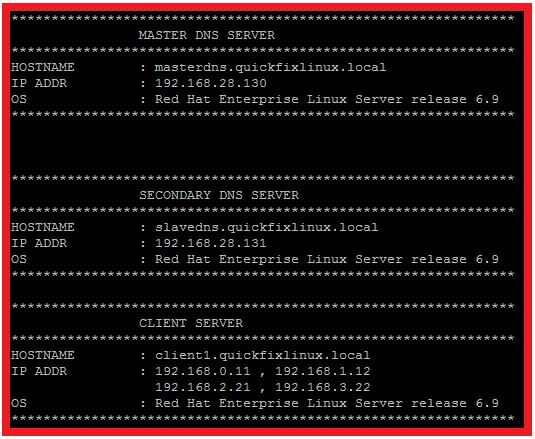
Here, I have used 4 different network segment IP Address, On HOW to show the configuration for reverse DNS setup.
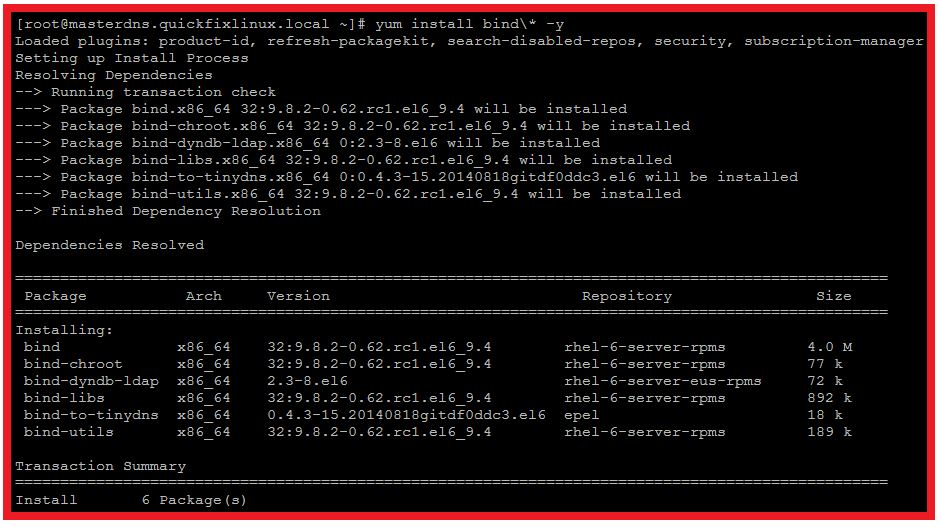
STEP :1
[stextbox id=”Default” mode=”css” bwidth=”7″ color=”FFFFFF” ccolor=”000000″ bcolor=”1A52EA” bgcolor=”000000″ bgcolorto=”000000″ image=”null”]
[root@masterdns.quickfixlinux.local ~] # yum install bind\* -y[/stextbox]
As I have configured yum repo, I am using yum to install the packages.
And the output as below :
STEP :2 ( Configure DNS SERVER )
Now, adding the changes as highlighted in color text in /etc/named.conf file:
[stextbox id=”Default” mode=”css” bwidth=”7″ color=”FFFFFF” ccolor=”000000″ bcolor=”1A52EA” bgcolor=”000000″ bgcolorto=”000000″ image=”null”]
| [root@masterdns.quickfixlinux.local ~]# cat /etc/named.conf // // named.conf // // Provided by Red Hat bind package to configure the ISC BIND named(8) DNS // server as a caching only nameserver (as a localhost DNS resolver only). // // See /usr/share/doc/bind*/sample/ for example named configuration files. //options { listen-on port 53 { 192.168.28.130; }; ### Master DNS IP ADDRESS ### listen-on-v6 port 53 { ::1; }; directory “/var/named”; dump-file “/var/named/data/cache_dump.db”; statistics-file “/var/named/data/named_stats.txt”; memstatistics-file “/var/named/data/named_mem_stats.txt”; allow-query { 192.168.0.0/24; 192.168.1.0/24; 192.168.2.0/24; 192.168.3.0/24; }; ### IP RANGE ### allow-transfer { 192.168.28.131; }; ### SLAVE IP ADDRESS ### recursion no;dnssec-enable yes; dnssec-validation yes;/* Path to ISC DLV key */ bindkeys-file “/etc/named.iscdlv.key”;managed-keys-directory “/var/named/dynamic”; };logging { channel default_debug { file “data/named.run”; severity dynamic; }; };zone “.” IN { type hint; file “named.ca”; }; ## Define our Forward and Reverse Zone file here for quickfixlinux.local zone “quickfixlinux.local” IN { type master; file “quickfixlinux.fwd.zone”; allow-update { none; }; }; zone “0.168.192.in-addr.arpa” IN { type master; file “quickfixlinux.rev-MG.zone”; ### Management IP ADDRESS ### allow-update { none;}; }; zone “1.168.192.in-addr.arpa” IN { type master; file “quickfixlinux.rev-PD.zone”; ### Production IP ADDRESS ### allow-update { none;}; }; zone “2.168192.in-addr.arpa” IN { type master; file “quickfixlinux.rev-BK.zone”; ### Backup IP ADDRESS ### allow-update { none;}; }; zone “3.168.192.in-addr.arpa” IN { type master; file “quickfixlinux.rev-PR.zone”; ### Provisioning IP ADDRESS ### allow-update { none;}; };include “/etc/named.rfc1912.zones”; include “/etc/named.root.key”; |
[/stextbox]
STEP 3:
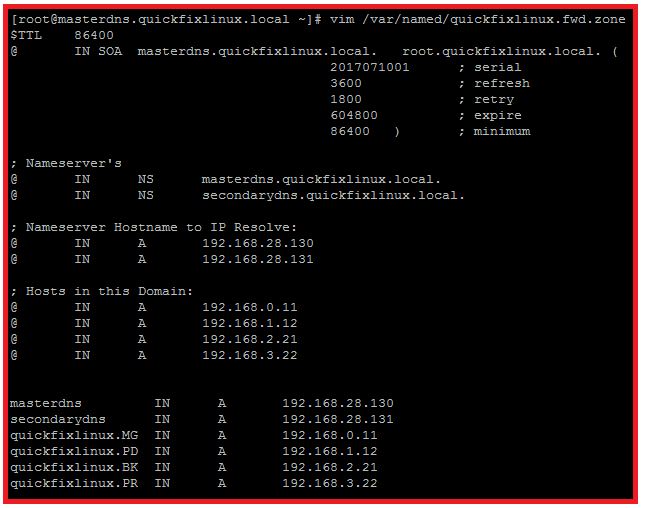
Creating Master Zone files:
3.1 Creating quickfixlinux.fwd.zone as defined in /etc/named.conf file
Here are going to use a existing sample files to create the forward and reverse zone files:
[stextbox id=”Default” mode=”css” bwidth=”7″ color=”FFFFFF” ccolor=”000000″ bcolor=”1A52EA” bgcolor=”000000″ bgcolorto=”000000″ image=”null”]
[root@masterdns.quickfixlinux.local ~]# cp /var/named/named.localhost /var/named/quickfixlinux.fwd.zone
[root@masterdns.quickfixlinux.local ~]# cp /var/named/named.loopback /var/named/quickfixlinux.rev-MG.zone
[root@masterdns.quickfixlinux.local ~]# cp /var/named/named.loopback /var/named/quickfixlinux.rev-PD.zone
[root@masterdns.quickfixlinux.local ~]# cp /var/named/named.loopback /var/named/quickfixlinux.rev-BK.zone
[root@masterdns.quickfixlinux.local ~]# cp /var/named/named.loopback /var/named/quickfixlinux.rev-PR.zone [/stextbox]
3.2 Create Reverse DNS zone entries as per /etc/named.conf file:

Now, you need to create the similar Reverse zone files for PD,BK and PR accordingly with reference on this MG zone file.
STEP 4:
Need to change the group permission of the newly created zone files:
[stextbox id=”Default” mode=”css” bwidth=”7″ color=”FFFFFF” ccolor=”000000″ bcolor=”1A52EA” bgcolor=”000000″ bgcolorto=”000000″ image=”null”]
[root@masterdns.quickfixlinux.local ~]# chgrp named /var/named/quickfixlinux.fwd.zone
[root@masterdns.quickfixlinux.local ~]# chgrp named /var/named/quickfixlinux.rev-MG.zone
[root@masterdns.quickfixlinux.local ~]# chgrp named /var/named/quickfixlinux.rev-PD.zone
[root@masterdns.quickfixlinux.local ~]# chgrp named /var/named/quickfixlinux.rev-BK.zone
[root@masterdns.quickfixlinux.local ~]# chgrp named /var/named/quickfixlinux.rev-PR.zone [/stextbox]
STEP 5:
Checking the zone files for any errors:
[stextbox id=”Default” mode=”css” bwidth=”7″ color=”FFFFFF” ccolor=”000000″ bcolor=”1A52EA” bgcolor=”000000″ bgcolorto=”000000″ image=”null”]
[root@masterdns.quickfixlinux.local ~]# named-checkconf /etc/named.conf
[root@masterdns.quickfixlinux.local ~]# named-checkzone masterdns.quickfixlinux.local /var/named/quickfixlinux.fwd.zone
[root@masterdns.quickfixlinux.local ~]# named-checkzone masterdns.quickfixlinux.local /var/named/quickfixlinux.rev-MG.zone
[root@masterdns.quickfixlinux.local ~]# named-checkzone masterdns.quickfixlinux.local /var/named/quickfixlinux.rev-PD.zone
[root@masterdns.quickfixlinux.local ~]# named-checkzone masterdns.quickfixlinux.local /var/named/quickfixlinux.rev-BK.zone
[root@masterdns.quickfixlinux.local ~]# named-checkzone masterdns.quickfixlinux.local /var/named/quickfixlinux.rev-PR.zone [/stextbox]
OUTPUT:

STEP 6:
Now, start up the named service:
[stextbox id=”Default” mode=”css” bwidth=”7″ color=”FFFFFF” ccolor=”000000″ bcolor=”1A52EA” bgcolor=”000000″ bgcolorto=”000000″ image=”null”]
[root@masterdns.quickfixlinux.local ~]# chkconfig named on
[root@masterdns.quickfixlinux.local ~]# /etc/init.d/named start
Starting named: [ OK ] [/stextbox]
STEP 7:
Open up the firewall for port 53, either external or internal firewall’s.
STEP 8 :
Add the Master DNS IP Address in /etc/resolv.conf file.
[stextbox id=”Default” mode=”css” bwidth=”7″ color=”FFFFFF” ccolor=”000000″ bcolor=”1A52EA” bgcolor=”000000″ bgcolorto=”000000″ image=”null”]
[root@masterdns.quickfixlinux.local ~] # vim /etc/resolv.conf
nameserver 192.168.28.130 [/stextbox]
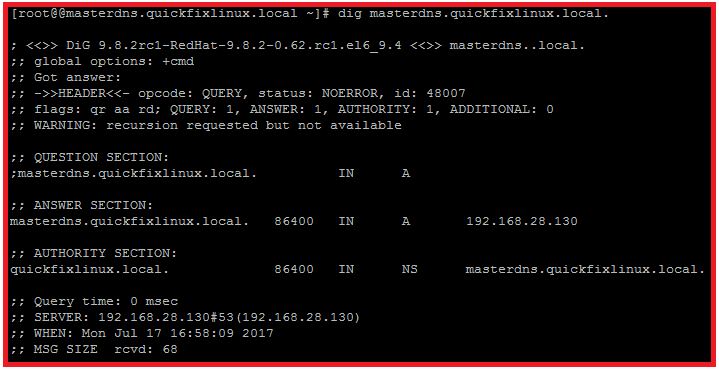
Now, we can check the status of the masterdns for Forward zone using the dig command